Table of Contents
ToggleImagine transforming your home into a cozy sanctuary with the flicker of a candlelight, all while impressing friends with your newfound crafting skills. Making candles isn’t just a fun weekend project; it’s a chance to unleash your inner artisan and fill your space with delightful scents that’ll have everyone asking, “Where’s that heavenly aroma coming from?”
How To Make Candles: A Complete Guide
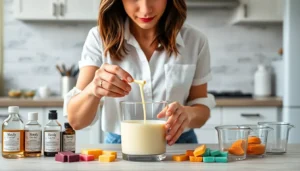
Gather essential supplies first. You’ll need wax, wicks, fragrance oils, and containers. Paraffin, soy, or beeswax works well for candle-making, each offering unique benefits.
Measure wax accurately. For a standard 8-ounce candle, about 6 to 8 ounces of wax suffices. Cut the wick to a length slightly longer than the container’s height for optimal performance.
Melt wax using a double boiler. Heat it slowly over medium heat, stirring occasionally. Maintaining a temperature of 170 to 180 degrees Fahrenheit helps achieve a smooth consistency.
Add fragrance oils once the wax melts completely. Typically, 1 ounce of fragrance oil per pound of wax provides an effective scent throw. Stir the mixture for a minute to ensure proper blending.
Secure the wick in the container. Use a wick holder or adhesive to keep it centered. Pour the wax carefully to prevent splashes and maintain wick placement.
Allow the candle to cool. This process generally takes 1 to 2 hours, depending on ambient conditions. Avoid moving the candle during this period to prevent uneven surfaces.
Trim the wick after the candle has fully solidified. Keeping the wick to about 1/4 inch above the wax ensures proper burning. Your candle is now ready for use or gifting.
Experiment with colors and patterns. Adding dye can create visually appealing effects, while layering different wax colors might yield unique designs.
Refer to online resources for troubleshooting. These guides help resolve common issues, such as poor scent throw or uneven burning, ensuring satisfaction in your candle-making journey.
Choosing Your Candle Wax
Choosing the right candle wax is crucial for achieving desired results. Various options exist, each with unique characteristics.
Types of Candle Wax
Paraffin wax remains one of the most popular choices, known for its affordability and excellent scent throw. Soy wax, derived from soybeans, offers an eco-friendly alternative, burning cleaner and longer. Beeswax stands out with a natural honey scent and a longer burn time, making it ideal for those looking for a premium option. Palm wax features a distinctive crystalline appearance, providing a unique visual appeal. Lastly, wax blends combine multiple types, enhancing scent throw and burn efficiency.
Factors to Consider
Burn time significantly affects user experience, so choose wax based on how long the candle should last. Scent throw impacts fragrance distribution; soy wax typically excels in this area, while paraffin offers a stronger scent. Appearance plays a role as well; some users might prioritize a flawless finish, while others enjoy the natural texture of beeswax. Additionally, ease of use varies; soy wax often melts easily, making it a favorite among beginners. Environmental concerns should also inform choices, particularly for those preferring sustainable options.
Essential Tools and Supplies
Gathering the right tools and supplies is crucial for successful candle making. The following categories outline the necessary equipment and materials.
Measuring and Melting Equipment
Measuring cups and spoons allow for accurate proportions of wax and additives. A sturdy heat-safe container serves well for melting wax. Double boilers or dedicated wax melters ensure even heating, preventing overheating and burning. Thermometers help monitor the temperature closely, maintaining the ideal wax temperature for adding fragrance. An immersion blender or stirring stick aids in mixing thoroughly. Proper safety equipment, including gloves and goggles, protects during the melting process.
Fragrance and Color Additives
Fragrance oils enhance the atmosphere, adding inviting aromas to finished candles. Choosing high-quality fragrance oils ensures a strong scent throw when burned. For color, candle dyes or natural colorants are available, allowing personalization of candle appearance. Using color additives in moderation achieves vibrant results without affecting wax performance. Testing small batches helps identify desirable scent and color combinations before making larger quantities.
Step-By-Step Candle Making Process
Candle making involves several key steps for achieving the best results. Following this detailed process ensures the creation of beautiful, fragrant candles.
Melting the Wax
Start with a double boiler to gently melt the wax. Heat the water in the lower pan while placing wax in the upper one. Monitor the temperature, aiming for 170 to 180 degrees Fahrenheit for optimal melting. Stir occasionally for an even consistency. Avoid boiling the wax, as it can affect the quality. If using paraffin, ensure proper ventilation due to fumes. Choose soy or beeswax for a more natural approach.
Adding Fragrance and Color
Integrate fragrance oil into the melted wax when it reaches 170 degrees Fahrenheit. Mix thoroughly to ensure even distribution of scent. Use about 1 ounce of fragrance oil for every pound of wax for a strong scent throw. After adding fragrance, incorporate candle dye or natural colorant if desired. Add color gradually and blend until the desired shade emerges. Testing small amounts first provides better control over the final appearance.
Pouring and Setting the Wax
Secure the wick in the center of the container before pouring. Hold the wick in place using a wick holder or skewer for stability. Pour the melted wax slowly to prevent bubbles. Fill the container, leaving a small space at the top. Supervise cooling for about 4 to 6 hours, allowing the candle to set properly. After cooling, trim the wick to a quarter-inch length for optimal burning. Store the candles in a cool, dark place until ready to use.
Common Mistakes to Avoid
Candle making offers enjoyment, but common mistakes can lead to disappointing results. Avoiding these pitfalls enhances the crafting experience.
Overheating the Wax
Overheating wax can spoil a candle’s quality. It’s crucial to maintain appropriate temperatures during melting. Use a thermometer to monitor the wax, keeping it within the recommended range, typically between 170°F and 180°F. Oil burns off outside this range, diminishing scent throw. If temperatures get too high, wax can also discolor, affecting appearance. Melting in small increments and stirring gently prevent overheating. Following these practices ensures the wax remains functional and preserves fragrance integrity, contributing to a better end product.
Incorrect Wick Sizing
Using the wrong wick size often results in improper burning. Wicks that are too small lead to weak flames, resulting in an inadequate melt pool. In contrast, oversized wicks create excessive soot and rapid burning. To achieve the right size, refer to wick charts provided by suppliers, which take into account wax type and candle diameter. Testing various wick sizes on sample candles helps in finding the ideal match, enhancing burn time and scent distribution. Selecting the appropriate wick ensures a balanced and appealing candle experience.
Making candles is not just about crafting a beautiful product; it’s about creating an experience. With the right supplies and techniques anyone can transform simple ingredients into stunning candles that enhance their home environment. The process encourages creativity and personalization allowing for unique scents and colors that reflect individual tastes.
As they dive into this rewarding hobby it’s essential to remember the tips and tricks shared throughout the guide. Avoiding common pitfalls will lead to better results and a more enjoyable candle-making journey. Whether for personal use or as gifts homemade candles are sure to impress and bring warmth to any space.